Photoshop Tips: Tan Skin Tone
Oct 30, 2006 36 Comments

Someone emailed me and asked how to make the golden/tan skin tone as seen in many movie posters and magazine advertisements. Believe it or not, the effect can be achieved by just couple mouse clicks. Here is a quick Photoshop tutorial to show you how to make a tan skin tone effect and apply makeups on the model. Let’s take a look at the image below, the left image is original photo and the right is final image.
Before & After

1. Overlay Layer
Open the original document that you want to apply the effect. Go to Layer > Duplicate Layer (or press Cmd + J) to duplicate the original layer. Set the duplicated layer Blending mode to Overlay. Then adjust the Opacity to 70%. The Opacity may be vary, depend on the brightness and color of your original photo source.

2. Highlight Spots
Select the original layer. Choose the Brush tool, set brush Size = 200px, Mode = Color Dodge and Opacity = 10%. Use the Eyedropper tool to pick a sample skin color from the image (Option+Click on the image). Gently brush on the areas that you want to be shine.

3. Eyeshadow
Make a selection around the eyelid, go to Selection > Feather (Cmd+Option+D) to feather the selection by 5px. Make a new layer and fill the selection with a light pink color. Then set the blending mode to Hue.

Make another selection slightly smaller than the pink layer. Again, feather it by 5px. Fill it with a blue purple color and set the blending mode to Darken.

4. Eyeliner
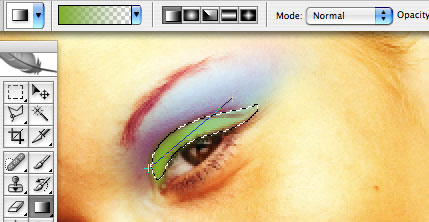
Make a selection of the eyeliner. Feather it by 3px. Make a new layer. Use the Gradient tool (pick a green color, select Foreground to Transparent), then drag from the lower corner to the upper corner of the selection. Adjust the blending mode to Multiply.

Final
Use the same technique to finish off the left eye. You may also use this technique to apply the color of the lip, blush, etc.


