Photoshop CS2 Splash Graphic
Dec 06, 2006 5 Comments
1. Create the Feather Paths
First create the paths of the feather with the Pen Tool.

2. Apply Gradient Color
Select the top 2 paths, fill it with Radial Gradient, pick similar colors as shown. Then repeat this step for the rest of the paths.


3. Apply Multiply
Select all the feather paths, go to Transparency pallate, select Multiply.

Final
Now you can duplicate the feather and lower the Opacity (Transparency).

Illustrator CS2 Splash Graphic
Dec 06, 2006 3 Comments
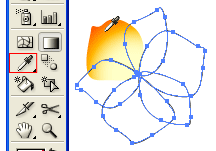
1. Create the flower paths
First create the paths of the flower with the Pen Tool.

2. Apply Gradient color
Select one of the petals, fill it with Radial Gradient (pick similar colors as shown) and select Multiply in Transparency pallate.

Select the un-filled petals, use the Eyedropper Tool, click on the gradient petal to copy the fill. You might need to adjust the gradient fill of each petal with the Gradient Tool.
3. Filament
Create a filament, fill it with Linear Gradient and select Multiply in Transparency pallete.

Then duplicate it.

4. Center
Use the Ellipse Tool, make a circle, fill it with Radial Gradient (as shown) and select Multiply in Transparency pallate.

Final
Duplicate the flower and lower the Opacity (Transparency).

Christmas Tree
Dec 06, 2006 1 Comment
1. Create the Tree Foundation
First, roughly create the tree path with Pen Tool and fill it with (green-darker green) gradient. Go to Effect > Distort & Transform > Roughen

Roughen Options
When the Roughen options window popup, enter the following values: Size: 5%, Detail: 100/in and select Points=Corner, then click OK.

2. Create the Art Brush
Now we need to make a New Art Brush for the tree branches. With the Pen Tool, make a path as shown below(1), fill with dark green, and apply the same Roughen effect as the previous step. Your path now should look like path(2). Duplicate path(2) by ALT+Drag or Copy & Paste, vertically scale it down a bit, and change it to lighter tone of green(3). Repeat this step, duplicate one more path and fill it with a even lighter tone of green(4).

New Art Brush
Select these 3 paths and drag it to the Brushes Library to make a New Art Brush.

Art Brush Options
Leave everything as default, but select Tints and Shades from the Colorization Method drop down menu.

3. Tree Branches
With the Pen Tool, create some wavily stroke paths and fill stroke color with green. Then apply these paths with the Art Brush you’ve created in the previous step. Adjust the Opacity between 40-50% so it blends with the tree. If you want bigger tree branches, apply thicker stroke weight, thinner stroke = smaller branches. Play around with the Opacity and Stroke Weight and try to make the tree looks as natural as possible.

4. Christmas Balls
Create various size and gradient Christmas balls with the Ellipse Tool. Place some on top of the tree, send some to the back, and put some behind the branches.

5. Light Bulbs
The tree still looks too plain, we need some more decorative lights. Create some light bulbs as shown on the left, drag it to the Brushes Library to make a New Scatter Brush.
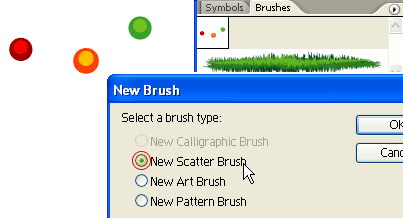
Scatter Brush Options
When the Scatter Brush Options window popup, select Random for all options and enter the range values as shown below.

6. Tree Lights
With the Pen Tool, roughly draw a zig zag path from the top to bottom, and apply the Scatter Brush you’ve created in the previous step. Notice how the light bulbs are randomly rendered base on the range values you’ve entered in the Scatter Brush Options, and you can change these setting at any time by double click on the Library object. If you want to have more lights, create another path and apply the same Scatter Brush.

Final
Download the source file now and see how it is done!

Christmas Hat
Dec 06, 2006 2 Comments
1. Hat
Start your hat by drawing 2 basic paths and filling them with Linear gradient (red to darker-red).

2. Shadow
Make a path (shadow path) like the image on the left. Select the top part of the hat, Copy & Paste in Front (Ctrl+F). Now, select the copied path and the shadow path, hold down Alt key and select Intersect shape areas in Pathfinder pallate.

Your path should looks like the image on the left. Repeat this step to make another shadow path for the bottom part of the hat. Then fill these 2 shadow paths with Linear gradient (red to darker-red), in your Transparency pallate, select Multiply.

3. Fur
With your Pen Tool, roughly draw a path like the image on the left and fill it with grey color. Go to Effect > Distort & Transform > Roughen

Roughen Options
In your Roughen window, enter the following setting: Size=8%, Detail=95/in, select Corner points. You may click on the Preview check box to preview your result.

Make a copy of the grey path by holding down Alt + drag (you may use Copy & Paste if you like) and fill it with white. Scale it down a bit and bring it up slightly above the grey path. Select the top part of the hat and its shadow, bring them to front by Object > Arrange > Bring to Front (Ctrl+Shift+]).

Use the Ellipse Tool to make the circle and repeat the previous step to make the furry ball.

Final
Your final illustration should looks like the image shown below.

Have Fun
Now, have fun with your Christmas hat!

3D Fruit Bowl
Dec 06, 2006 3 Comments
1. Create the Bowl
Create a path and fill it with yellow like the image below. Then, select Effect > 3D > Revolve from the menu.

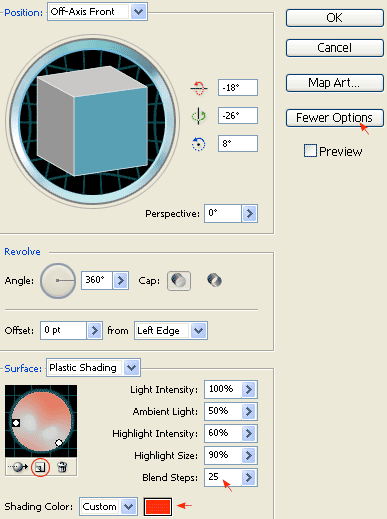
2. Apply 3D Revolve Setting
When the 3D Revolve Option window pop-up, apply the following settings:
- Click on More Options if the lower portion of the window is not showing.
- Create a new light by clicking on the New Light icon and drag the two lights as shown.
- Change Shading Color to orange by: selecting Custom from the drop drop, click on the sample color box to open the Color Picker window, then enter this color values – R=255 B=50 G=0.
- If you want a smooth blending, increse the Blend Steps (default is 25, max is 256). Note: increase Blend Steps will increase file size and memory usage.
3. Create the Apple
Create an oval path with the Ellipse Tool ![]() and fill it green. Then select that green path and apply Effect > 3D > Revolve, leave all options in the 3D Revolve Option window as default and click OK. Now, you should get something like the image shown below:
and fill it green. Then select that green path and apply Effect > 3D > Revolve, leave all options in the 3D Revolve Option window as default and click OK. Now, you should get something like the image shown below:

4. Add Drop Shadow
Keep the apple path selected, go to Effect > Stylize > Drop Shadow and apply the setting as shown below.

5. Create New Art Brush
First create a path similar to the image below, fill it with black (k=100), and then create the highlight path and fill it with 80% black (k=80). Drag it to the Brush library window to create a New Art Brush. If your Brush library is not on the screen, go to Window > Brushes or press F5.

New Art Brush Options
The Art Brush Option window should pop out, select Tints from the Colorization Method drop down menu, leave everything as default, and click OK.

6. Draw the Apple’s Stem
Create a stroke path with the Pen Tool and select the Art Brush that you have created in the previous step. Now place it on top of the apple like the image shown below.

7. Duplicate the Apple
Select the apple (with stem), hold down the ‘Alt‘ (or ‘Option‘ key for Mac), drag it to make a copy of it. You may also use Copy & Paste to duplicate the apple. Then, change it to red.

8. Adjust 3D Revolve Setting
Select the red apple (oval path only). In the Appearance pallate, double click the 3D Revolve effect icon to adjust the options/setting. If the Appearance window is not showing, go to menu and click on Window > Appearance or press Shift+F6.

3D Revolve Options
Now the 3D Revolve Option window should pop-out. Enter the following values: X=57, Y=63, Z=-159. You can change the rotation values manually by entering the numbers or by dragging the cube on the left.

9. Fix the Apple’s Stem
Notice hot the stem’s position is slightly off after you have rotated the apple. Move the stem stroke to the center of the apple by using the Selection Tool or Direct Selection Tool.

10. Add More Apples
Make more apples by repeating Step 7 to 9.

11. Put Them Together
Put the apples and the bowl together as shown. Draw an oval shape path, base on the shape of the bowl.

12. Mask the Apples
Select the the apples and oval path only, go to Clipping Mask > Make or press Ctrl+7

Final
Your illustration should look like the image below:

Chinese Bamboo
Dec 06, 2006 2 Comments
1. Draw the Bamboo Body
Create a path like the image below with the Pen Tool and fill it with the color green. Select the Mesh Tool and click on the lower left corner of the bamboo body (pt. 1) to add a mesh point. Then change it to a lighter tone of green (yellow-green). Now add another Mesh point at the upper left corner of the bamboo(pt. 2). Add another point above pt. 2. Add a final point beside pt. 2 and select a darker green tone for the shadow.

2. Create the Bamboo Stick
Select the bamboo body you’ve created in the previous step, hold down the ALT key, drag it up to make a copy (you can use Copy & Paste if you like). Then resize the new bamboo body horizontally with the Selection Tool. Send this new bamboo body behind the first bamboo body by selecting Object > Arrage > Send Backward or press Ctrl+[. Repeat this step until you get a stack of 5 or 6 bamboo bodies.

3. Duplicate the Bamboo Stick
After you’ve finished the first bamboo, make a copy of it by ALT drag or Copy & Paste. Select the new bamboo stick, apply Filter > Distort > Twist(Angle=3) so that they don’t look identical.

4. Draw a Bended Bamboo
We want the bamboo to look natural, so we need to create some bended bamboo. Repeat Step 1 & 2 to create a bended bamboo like the image shown below. Now we 3 different forms of bamboo: straight, bended, and twisted.

5. Duplicate More Bamboo
Make more bamboo by ALT + drag. Flip and resize them around so they don’t look alike.

6. Create the Bamboo Leaves
Create the basic shape of the bamboo leaves. Use the Mesh Tool to apply a mesh gradient on it.

7. Make a Bamboo Leaves Symbol
Drag the bamboo leaves to the symbol panel to create a new Symbol. If your symbol panel is not visible, go to Window > Symbols or press Ctrl+Shift+F11.

8. Symbol Sprayer Tool
Create a new layer and lock the bamboo sticks layer(Layer 1). Select the Symbol Sprayer Tool and pick the bamboo leaves Symbol. Spray it on Layer 2 by dragging the mouse.

9. Symbol Sizer Tool
To create various sizes of bamboo leaves: use the Symbol Sizer Tool and randomly click on the bamboo leaves object. Tips: hold down ALT key+click to reduce size.

10. Symbol Spinner Tool
Use the Symbol Spinner Tool to rotate/spin Symbols.

11. Symbol Shifter Tool
Use the Symbol Shifter Tool to spread out the bamboo leaves by dragging your mouse around.

12. Symbol Stainer Tool
Select a lighter green color and use the Symbol Stainer Tool to tint the symbols.

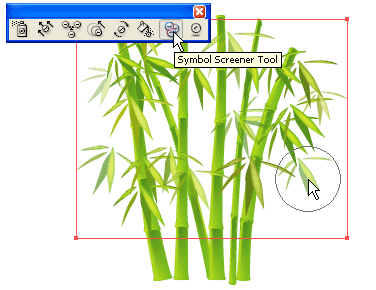
13. Symbol Screener Tool
Use the Symbol Screener Tool to reduce the opacity of the bamboo leaves. This will result in a transparent effect.
14. Make More Leaves Behind
After you done with the leaves on Layer 2, make a new layer(Layer 3) behind the bamboo stick layer. Lock Layer 1 and Layer 2, use the Symbol Sprayer Tool to create more bamboo leaves(refer to Step 8-13).

15. Add More Bamboo Sticks
Duplicate more bamboo sticks. Resize and send them behind the big bamboo sticks.

Final
Here is the final image.

3D Vase
Dec 06, 2006 4 Comments
1. Create a Path
First, create a path like the image shown below with the Pen Tool, go to menu Effect > 3D > Revolve

3D Revolve Option
The 3D Revolve Option window should pop-up and looks like the image below. Click on More Options if the lower portion window is not showing. You can leave most of the settings as default, but add an additional light spot by clicking on the New Light icon and drag it to the lower left corner as shown. Enter 35 for Blend Steps, maximum Blend Steps is 256, higher Blend Steps will have a better rendering quality but will also increase the file size.

2. Create the Flower Symbol
Now use the Ellipse Tool, create a flower like the image below. I have a very simply flower illustration here, but you can create anything you like. Drag the flower to the Symbols Library Pallate to create a new symbol. If your Symbols Pallate is not showing, press Ctrl+Shift+F11 or go to Windows > Symbols to show Symbols.

3. Create Map Art
With the vase object selected, in Appearance Pallate, double click on the 3D Revolve effect icon(f) to change the 3D Revolve Options.

When the 3D Revolve Option window pop-up, click on the Map Art button.

Map Art Option
Check Preview option to preview the result. At the top where it says Surface, use the arrow buttons to locate the surface that you want to Map Art. Notice there is a red wireframe on your object which shows you the surface you’ve selected. In this case, it is 4 of 5. From the Symbol drop down, select the symbol that you’ve created in the previous step. You can position and resize the symbol as you want. You can also create multi-surface Map Art by selecting the Surface then the Symbol. Click OK when you are happy with the result.

Final
That’s it! With just 3 simple steps, I just created a nice 3D Vase with Illustrator 3D Revolve Tool.

3D Graphs
Dec 06, 2006 1 Comment
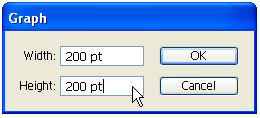
1. Create the Graph
Select the Pie Graph Tool, click on the Artboard/screen, then enter 200×200px.
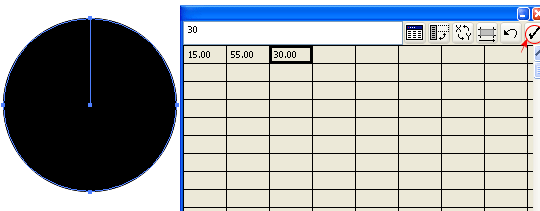
Data Table
Your graph data table will pop-up like the image below. Enter 15, 55, 30 and then click on the check mark to apply changes. Close the data table.
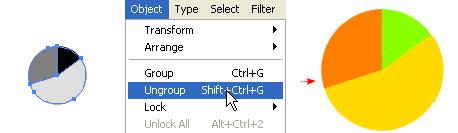
2. Ungroup the Graph
You need to ungroup or break the graph into parts in order to apply colors and effects to each individual piece. With the graph selected, go to Object > Ungroup or press Ctrl+Shift+G to break-up the graph into individual parts. There will be a warning box with this message: After a graph is ungrouped you will no longer be able to access its graph style, its data or change its graph designs. Click Yes. Now Ungroup again to break the object into pieces. Fill with any color you want and remove the stroke color.
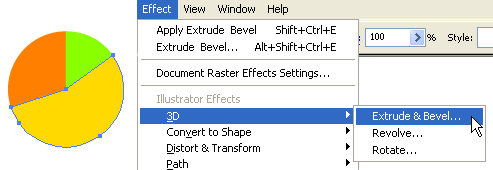
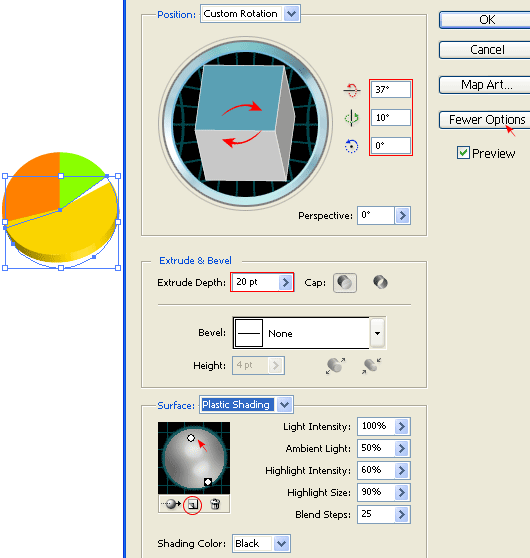
3. Apply Extrude & Bevel
Select any piece(I’ve selected yellow here), go to Effect > 3D > Extrude & Bevel.
3D Extrude & Bevel option
Expand the window by clicking on More Options. Now you may drag the cube on the left to specify the Rotation or enter the X-Y-Z Axis values manually. Enter 20pt for Extrude Depth. Add one more Light by clicking on the New Light icon and drag it as shown below.
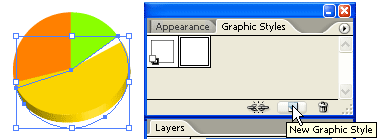
4. Make a Graphic Style
With the yellow piece selected, in the Graphic Styles pallate, click on the New Graphic Style icon. If your Graphic Styles pallate is not showing, go to Window > Graphic Styles or press Shift+F5.
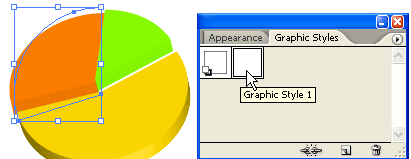
5. Apply Graphic Styles
Now select the orange and green piece, click on the Graphic Style you’ve created in the previous step to apply the styles to the orange and green piece.
Final
To finish off, reposition the pieces of the pie. Notice after you have applied the Graphic Styles, the pie is off a bit, use the Selection Tool and put them back together. Now you have a nice colorful 3D pie graph.

Bonus Tips
You can use the same technique to create the bar graph like the image below. Click here to download the source file for this Bar Graph sample.


